Once you have an understanding of the reports available, it’s important to be able to understand how to interact with them. We’ll cover how to generate, filter and export the available reports in TagMatiks AT Lite.
In order to view meaningful data with TagMatiks AT Lite, you must start using the solution and start populating data. For example, for the Inventory Report, you must complete an inventory transaction before data will populate.
This document is divided into multiple sections as:
1. Open the TagMatiks AT Lite application and login into it.
2. Scroll down the menu and click on the “REPORTS” button as shown in the image below.
3. You will see the different reports button as shown in image below, click on “Asset Reports” button to generate the asset.
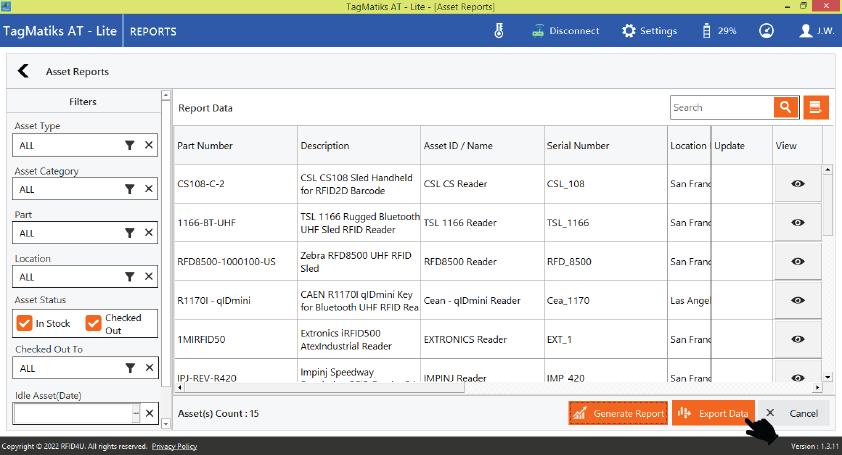
4. The Asset Report is designed to view all the assets in the system. By running this report, you will be able to see a detailed view of all the assets. The report includes filters so you can see All Assets, In Stock Assets or just the ones that are checked out. There are additional filters as well.
5. You can filter the Report Data according to Asset type, Asset category, Part and locations.
6. You can also filter the Asset report according to the asset in stock and Checked out.
7. Click on the checkbox of “In Stock” and “Checked Out” to enable and disable the filter.
8. Click on the “Generate Report” button from the bottom of the application to generate the report as shown in image below.
9. Click on View button from the left hand side of the application to see the details view of the asset as shown in the image below.
10. You will see a new Asset details window, click on the “Cancel” button to close the asset details window.
11. To export the report, click on the “Export Data” button as shown in image below.
12. A new popup will open to select the Export format click of the combo box.
13. Select the Format from the list as shown in image below.
14. Click on the “Export” button to save the file.
15.A folder will open with Automatically generated filename. Click on the “Save” button to save the file.
16. The Transaction Report is designed to list all of the transactions (Checkout, Checkin and Transfers) that occurred in TagMatiks AT Lite. You can also filter by transaction type before generating the report.
17. You can filter by transaction type before generating the report.
18. You can also export the report data in a different format. The process is the same as explained above in “Export the Report” section.
19. The Inventory Report is designed to view the status of the last inventory that was conducted.
20. By running this report, you will be able to see the snapshot details of the matched, missing, and misplaced assets.
21. You can also export the report data in a different format. The process is the same as explained above in “Export the Report” section.
22. The Utilization Report is designed to help you keep track of the number of cycles an asset has been checked out.
23. To use this feature completely, be sure to turn it on under the Configuration settings.
24. In addition, on this report, you can reset the warning count which is essentially the threshold for how many times an asset should be used.